Shading & Value
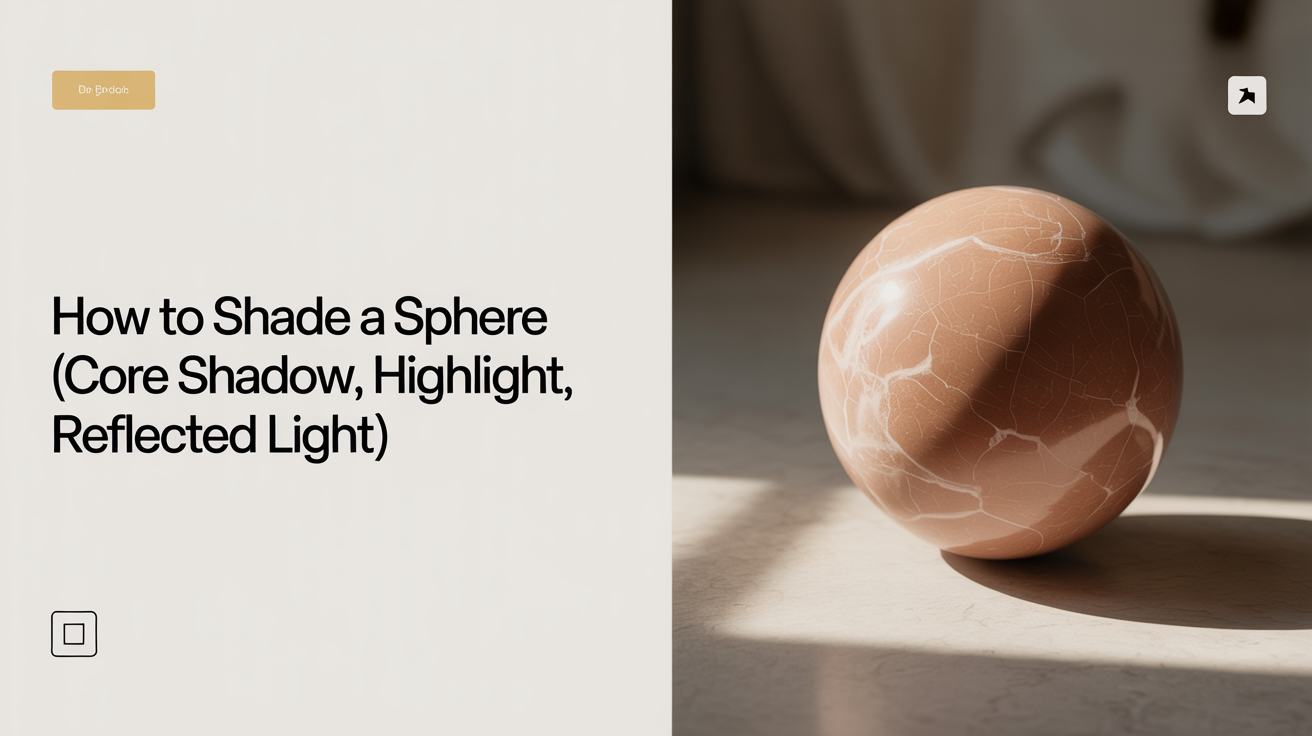
How to Shade a Sphere (Core Shadow, Highlight, Reflected Light)
Learn how to shade a sphere step by step. Understand core shadow, highlight, reflected light, and cast shadow to make a flat circle look like a solid 3D ball.
A shaded sphere is the classic test of whether you understand light. It sits on countless art-school assignments for a reason: one simple shape contains every tonal zone you will encounter in almost any subject. Get comfortable with the sphere and you have a mental framework you can apply to a cheek, a piece of fruit, or a folded piece of cloth.
This guide walks through shading a sphere step by step, explains each lighting term when it first appears, and gives you concrete pencil-grade and pressure suggestions so you can follow along without guessing.
What You Need Before You Start
You do not need a lot of materials for this exercise. A sheet of smooth cartridge or copy paper works fine. For pencils, a 2H for pale tones, an HB or 2B for mid-tones, and a 4B or 6B for the darkest areas covers the full range. If you only have one pencil, use it at very light pressure for highlights and press harder for shadows.
A kneaded eraser is helpful for lifting the lightest spot (the specular highlight), but a regular vinyl eraser cut to a point also works.
Draw your circle first. Trace a coin or cup if you like; the circle itself is not the lesson here.
Before picking up the pencil, take a moment to decide where your imaginary light source sits. This guide uses a light from the upper left. Every tonal decision flows from that choice.
Understanding the Five Tonal Zones
Shading a sphere involves five distinct areas. Knowing their names helps you see them before you draw them.
Highlight is the brightest spot, where the light hits the surface most directly. On a smooth sphere it appears as a small, sharp oval. You create it by leaving the paper bare or lifting graphite with a kneaded eraser.
Midtone (sometimes called the halftone) is the large middle-value area between the highlight and the shadow. It covers most of the lit side of the sphere.
Terminator is the boundary where the lit side ends and the shadow begins. On a sphere it is a soft, curved band rather than a hard edge. Beginners often draw it too sharply; in practice it should blend gradually into the core shadow.
Core shadow is the darkest band on the sphere itself. Confusingly, it does not sit at the very edge of the sphere; it sits just inside the terminator on the shadow side. The edge of the sphere, by contrast, is often a touch lighter because of reflected light (see below).
Reflected light is a subtle lighter strip along the back edge of the shadow side. Surfaces around the sphere (a table, a nearby wall) bounce some light back onto the shaded area. Beginners sometimes leave this zone too bright, which makes the sphere look painted; keep it noticeably darker than the midtone.
The sphere also casts a cast shadow on the surface below it. This is a separate shadow from the core shadow. It is darkest directly under the sphere and fades outward in an elliptical shape.
Shading a Sphere Step by Step
Work from light to dark. It is much easier to deepen a tone than to erase one.
-
Reserve the highlight. Lightly mark the small oval where the highlight will sit (upper left of center for our setup). Keep this area completely clean throughout.
-
Lay in the midtone. Using a 2H or an HB at very light pressure, shade the entire sphere except for the highlight oval. Use smooth, circular strokes or gentle hatching. The goal is a uniform light tone across the whole lit and shadow side.
-
Build the shadow side. Switch to an HB or 2B and increase pressure on the shadow side, the right half of the sphere in our example. Blend toward the terminator line so it softens rather than ending in a sharp stripe.
-
Deepen the core shadow. With a 2B or 4B, darken the band just inside the terminator. This is the single darkest tone on the sphere itself. Apply pressure gradually; you can always add more.
-
Add reflected light. Near the far edge of the shadow side, lighten your pressure slightly so a thin strip of medium-dark tone remains. Do not go as light as the midtone. This subtle lighter value is the reflected light coming off the ground or surrounding environment.
-
Blend the terminator. Use a fingertip, a paper stump, or very light circular strokes to soften the line between the midtone and the core shadow. The shift should feel gradual across a band about as wide as a fingernail.
-
Draw the cast shadow. Below the sphere, draw an ellipse that touches the bottom of the circle. Fill it darkest directly under the sphere using a 4B or 6B, then fade outward with lighter pressure. The far edge of the cast shadow is soft, not a hard outline.
-
Refine the highlight. If graphite has crept into the highlight area, press a kneaded eraser lightly to lift it back to white. A sharp highlight makes the surface read as glossy; a softer one suggests a matte surface.
Take your time on steps 4 and 6. Many beginners rush past the core shadow or skip the reflected light entirely, and both choices flatten the form.
Common Mistakes and How to Avoid Them
Making the core shadow at the outer edge. The darkest area is not the silhouette edge of the sphere; it is an interior band. If your outer edge is the darkest part, the reflected light is missing.
Leaving the terminator as a hard line. A sharp terminator makes the sphere look like two flat half-circles pasted together. Blend that transition until you cannot see where it starts.
Over-brightening the reflected light. Reflected light is real, but it is still in shadow. If it matches your midtone, the shadow side will look lit from two directions at once. Keep it darker than any part of the lit side.
Skipping the cast shadow. A sphere floating without a shadow looks like a flat disk or a sticker. Even a minimal cast shadow locks the object to the surface and reads as three-dimensional.
If your early attempts look flat or uneven, that is normal. The ability to judge small value differences develops with practice; your eye calibrates over many drawings. For further reference on building a structured range of tones, see how to draw a value scale and why it matters. And if you want to go deeper on the general mechanics of pencil pressure and stroke direction, how to shade with a pencil: a beginner's guide covers the fundamentals. For building texture and interest on larger shadow areas, hatching and crosshatching for beginners is worth reading alongside this exercise.
Practicing Beyond the Basic Sphere
Once you can shade a single sphere with a clear light source, vary the exercise in small ways.
Try moving the light source. Place it at the right, below, or directly above and remap each tonal zone. You will quickly notice how the terminator, highlight, and cast shadow shift together as a system.
Try different surfaces under the sphere. A dark table bounces more light back onto the shadow side, making the reflected light brighter. A white surface bounces less. Observing this difference builds a more flexible understanding of how reflected light works in practice.
Try drawing two spheres side by side, one slightly behind the other. The foreground sphere casts a shadow on the background sphere. Working through this teaches you to think about how objects interact under the same light, which is the foundation of still-life drawing.
Frequently Asked Questions
Where exactly is the core shadow on a sphere? The core shadow sits on the shadow side of the sphere, a short distance in from the silhouette edge. It is the darkest band on the sphere's surface. The edge itself is slightly lighter because reflected light from the environment bounces back onto that rim.
How do I know where to put the highlight? The highlight sits where an imaginary line from the light source to the sphere surface would bounce directly back to your eye. For a light placed at upper left and a viewer looking straight on, this lands in the upper-left quadrant of the sphere, slightly above center.
My terminator line looks sharp no matter what I do. How do I soften it? Work in very light layers and blend with a fingertip or paper stump while the graphite is still unburnished. Going back over a hard edge with circular strokes after the fact also helps. The key is to think of the terminator as a zone of gradual change rather than a single line to draw.
Should the cast shadow be darker than the core shadow? Often, yes. The cast shadow directly under the sphere is typically the darkest value in the whole drawing because it receives no direct light and very little reflected light. The core shadow, by comparison, picks up at least a little environmental bounce, so it reads slightly lighter than the deepest part of the cast shadow.
What pencil grade works best for this exercise? A range works better than any single grade. A 2H gives you control over pale midtones without smearing; a 2B builds mid-shadow quickly; a 4B or 6B reaches the deep core shadow without requiring excessive pressure. If you are working with a single pencil, use consistent, light pressure for the lit side and build up layers for the shadow side rather than pressing hard in one pass.