Subjects & Projects
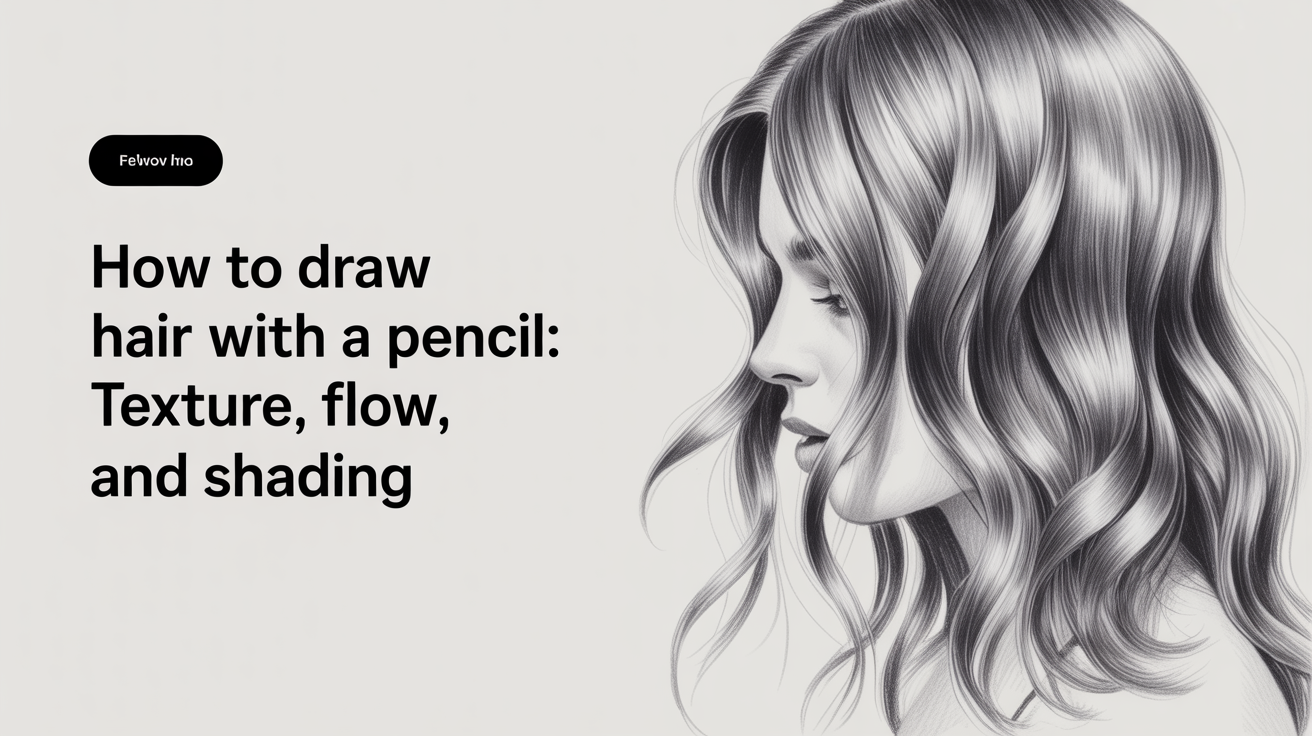
How to Draw Hair With a Pencil: Texture, Flow, and Shading
Learn how to draw realistic hair with a pencil. Block in masses, establish light and shadow, then add directional strokes for straight, wavy, and curly hair.
Hair is one of the most satisfying subjects to draw once you understand a simple rule: you are not drawing individual strands. You are drawing masses of tone and then suggesting strand direction with groups of marks. Artists who try to draw every hair individually end up with results that look stiff and wire-like, like a row of noodles glued to a head. The fix is to think in shapes and values first, detail second.
This guide walks through the core approach for drawing hair with a pencil and then applies it to three hair types: straight, wavy, and curly.
Why Hair Drawing Starts With Mass, Not Strands
Before putting pencil to paper, it helps to understand two terms: value and mass.
Value means the lightness or darkness of a tone. A full value range runs from the white of the paper to the deepest black your pencil can make. Mass, in drawing, means a clump or group of shapes treated as a single unit rather than individual elements.
Hair works the same way in real life. Light falls on a head and creates large zones: a bright highlight area, a mid-tone band, and deep shadow pockets. Those zones are what your eye actually reads when you look at someone's hair. The individual strands are secondary information that the brain fills in.
When you start by mapping those value zones, the hair reads as natural and dimensional. When you skip them and jump to strands, the result is flat because nothing tells the viewer where the light is coming from.
The rule: block first, strand second, every time.
Pencil Grades and Pressure for Hair
You do not need a full set of pencils to draw convincing hair. A 2H, HB, and 2B will handle most situations.
H pencils (2H is a good starting choice) leave a light, cool gray. Use them to map the lightest mid-tones and to ghost in the overall shape without committing to dark lines you will have to erase later.
HB sits in the middle and works for the bulk of mid-tone shading.
B pencils (2B or darker) lay down rich, warm darks. Use them in the shadow pockets deep inside curls, under layers of hair, and at the roots where hair meets the scalp.
The highlight area is mostly the paper itself. Resist the urge to shade into it. A kneaded eraser can lift out a shine line after the fact if you shade over it by accident.
Pressure matters as much as grade. A 2B pencil dragged lightly leaves a soft mid-tone. The same pencil pressed firmly leaves a deep dark. Practice varying pressure on a scrap sheet before starting the main drawing. For more on controlling your shading strokes, see how to blend pencil shading smoothly.
Step-by-Step for Three Hair Types
The underlying approach is the same for all three types below: shape first, value zones second, directional strokes third. What changes is the direction and grouping of those strokes.
Straight Hair
Straight hair has long, parallel flow lines that run from the roots down toward the tips. The highlight is usually a clean vertical stripe along the top of the hair mass.
-
Block the overall shape. Lightly sketch the outer silhouette of the hair. Note where it parts, where it falls over the shoulder, and where it tucks behind the ear. Keep the lines loose.
-
Map the value zones. Shade the shadow side of the hair (usually away from the light source) with light HB strokes. Leave the highlight stripe untouched.
-
Add directional strokes. Using a sharpened HB or 2B, draw clusters of parallel lines flowing downward from roots to tips. Work in groups of five to ten strokes rather than drawing each hair separately. Vary the pressure so some strokes are lighter at the tips.
-
Deepen the darks. Use a 2B to push the shadow zones darker, especially near the scalp and at the edge of the hair farthest from the light. Blend those transitions lightly with a finger or blending stump if needed.
-
Refine the edges. The outer silhouette of straight hair tends to be fairly clean, but a few stray flyaway lines at the edge add life. Draw three or four fine strokes that break just outside the silhouette.
Wavy Hair
Wavy hair moves in S-curves. The highlight shifts from one side of each wave to the other as the curve changes direction, which gives wavy hair its characteristic sheen.
-
Sketch the wave path. Draw a light center line that follows the S-curve of the main wave. This is your flow guide, not a final mark.
-
Block in the mass. Shade the entire hair shape with light HB strokes, leaving space near the tops of each wave curve for the highlights.
-
Follow the curve with your strokes. Directional marks should arc and bend with the wave. On the near side of a curve, strokes fan out slightly. On the far side, they converge back together.
-
Build up darks in the valleys. The inside of each S-curve sits in shadow. Use 2B strokes to deepen those pockets. This is what makes the hair look three-dimensional.
-
Lift highlights. A kneaded eraser shaped to a fine point can lift a thin stripe at the crest of each wave to punch up the shine.
Curly Hair
Curly hair requires the most departure from strand-by-strand thinking. Tight curls form overlapping coils that cast shadows on each other. The result is a pattern of light and dark masses rather than visible flow lines.
-
Map the clusters. Instead of outlining every curl, identify groups of curls and treat each group as a single mass. Sketch the boundary of each cluster loosely.
-
Shade the shadow side of each cluster. Use HB strokes to shade the lower half or inner side of each curl cluster, leaving the top edge lighter.
-
Use short, curved strokes. The directional marks for curly hair are short arcs that follow the coil direction. They do not need to be long or precise. A series of short C-curves layered together reads as curly texture.
-
Deepen the pockets. The space between curls where one coil tucks under another should be close to black. Use a 2B with firm pressure in those gaps.
-
Avoid outlining individual curls. Drawing a hard outline around each curl makes it look like a cartoon spring. Let the dark shadow pockets define the separation instead.
For context on how hair fits into a full face drawing, see how to draw a face: beginner proportions step by step. Getting the hair to sit correctly on the head depends on understanding the skull shape underneath it.
Correcting the Most Common Beginner Mistake
The single most common error in hair drawing is going strand by strand from the start. It produces a drawing that looks more like a grass mat than natural hair, and it also takes far longer because there are tens of thousands of hairs on a human head.
If your drawing starts to feel stiff, stop and ask two questions:
- Have I established the light and shadow zones clearly, or is the value across the whole hair mass roughly the same?
- Are my strokes running in the same direction as the hair's natural flow, or are they random?
Most stiff hair drawings fail on one or both counts. The fix is not to add more strokes but to step back, look at the value structure, and build it up correctly from the base. Patience here pays off more than speed.
It also helps to study how hatching can build value in a controlled way. See hatching and crosshatching for beginners for the underlying mechanics. Hair strokes are really a directional form of hatching applied to an organic subject.
When you are ready to place hair on a face with convincing eyes below it, how to draw eyes that look real covers the structure and shading approach for the area just beneath the hair.
Frequently Asked Questions
Do I need a mechanical pencil or a wood pencil for hair?
Either works. A sharp wood pencil (2H or HB) is useful for the fine directional strokes in the detail pass. A mechanical pencil with 0.5mm lead stays consistently sharp and is easier to control for tight curl work. Wood pencils with a chisel point can lay down wider tonal areas faster. Most beginners have better results with a sharpened wood pencil because the softer grades (2B) are easier to find in wood-pencil form.
How do I draw a shine or highlight in hair?
Leave the highlight area unshaded from the start. If you shade over it accidentally, a kneaded eraser rolled to a fine tip will lift the graphite back toward the paper tone. For a very precise, bright highlight in a finished drawing, a white colored pencil or white gel pen over the graphite can work, but it is not necessary on lighter paper.
My curly hair drawing looks like a bunch of circles. What am I doing wrong?
The circles problem usually comes from outlining each curl rather than shading the shadow between them. Try reversing your approach: instead of drawing the curl itself, shade the dark gap between curls. The un-shaded area that remains will read as the lit side of the curl without needing an outline at all.
How dark should the darkest shadows be in hair?
Dark enough to create clear contrast with the highlight area. For most pencil drawings on white paper, the shadow pockets in curly hair or the underside of wavy hair benefit from a solid 2B or 4B pass, which can get close to black. A weak dark-to-light ratio is one reason hair drawings look flat. Push the darks further than feels comfortable and see if the overall drawing improves.
How long should each directional stroke be?
For straight hair: as long as the flow of the hair, from root to tip in one motion. For wavy hair: medium-length strokes that arc with the wave. For curly hair: short, maybe 1-2cm, curving strokes that follow the coil. Longer strokes on curly hair tend to fight the texture and make it look wavy instead.