Subjects & Projects
How to Draw a Face: Beginner Proportions Step by Step
Learn how to draw a face for beginners with simple proportion guidelines, a clear step-by-step walkthrough, and tips for avoiding common mistakes.
Drawing a face from the front looks intimidating, but most of the difficulty comes from guessing where features go rather than any lack of drawing skill. Once you understand a handful of proportion guidelines, the guesswork disappears. This guide walks you through face construction from a blank oval to a finished sketch, one step at a time.
Why Proportions Matter Before You Touch a Detail
Most beginners place the eyes too high on the head. It feels natural to push them up, because the face (the part we focus on socially) takes up the bottom half of the skull. The top half is forehead and cranium, and we tend to underestimate it.
Proportion guidelines are not rigid rules; they are averages based on studying many faces. Real people deviate from them constantly, and that deviation is what creates individuality. The guidelines give you a neutral starting point. Once you know where "average" sits, you can shift a feature intentionally rather than accidentally.
You will also hear the term construction lines throughout this guide. These are light, temporary lines you draw to map positions before committing to details. Draw them with almost no pressure so they erase easily later.
The Standard Front-View Proportion Guidelines
Before drawing a single line, it helps to have the landmark list in one place. Memorize these and they will start to feel automatic within a few sessions.
| Landmark | Where it sits |
|---|---|
| Eyes | On the horizontal halfway line of the whole head |
| Eye width | Each eye is roughly 1/5 of the total head width |
| Total eye span | Five eye-widths fit across the full width of the head |
| Space between eyes | Approximately one eye-width |
| Nose bottom | Halfway between the eye line and the chin |
| Mouth | One third of the way down from nose bottom to chin |
| Ears | Top of ear aligns with brow line; bottom aligns with nose bottom |
| Hairline | About one third of the way down from the top of the skull |
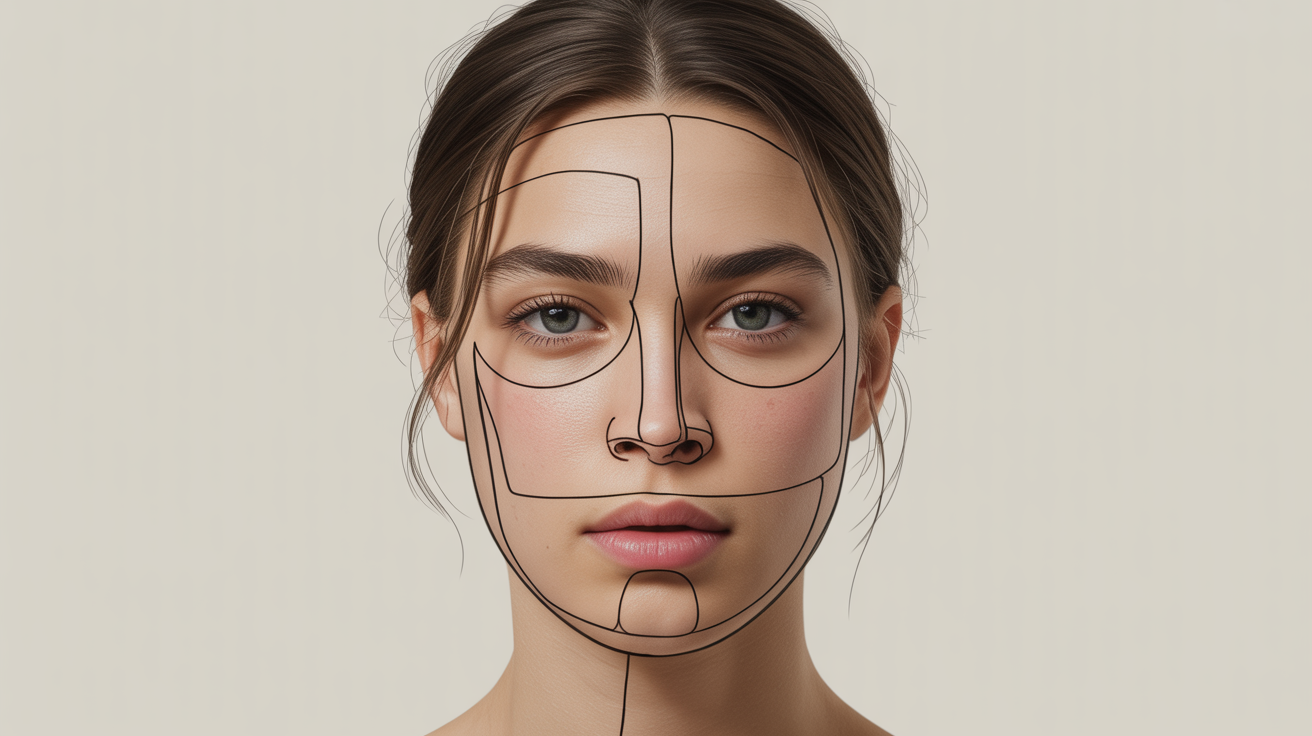
The "five eyes wide" rule is worth pausing on. If you divide the head into five equal vertical columns, the two outer columns are space beyond the eyes, the two inner columns are the eyes themselves, and the center column is the gap between them. This single check catches most placement errors on a first draft.
Building the Head Shape
The classic approach is to start with a circle for the upper cranium, then attach a tapered jaw below. Some teachers call this the Loomis method (named after artist Andrew Loomis), though the underlying geometry is much older. For a front view, the full procedure is simpler than the angled version you might have seen.
Step 1. Draw a circle lightly. It does not need to be perfect; a slightly irregular oval is fine. This represents the top portion of the skull.
Step 2. Find the vertical center of the circle and draw a faint vertical line through it, extending below the bottom of the circle. This is your center line, and it will keep both sides of the face symmetrical.
Step 3. Extend the sides of the circle downward with gentle curves that narrow toward a point or a soft squared chin. Most adult faces taper; children's faces are rounder with a shorter chin. The distance from the bottom of the circle to the chin is roughly equal to the radius of the original circle, though this varies by face type.
Step 4. Find the halfway point of the entire head shape (top of skull to chin) and draw a faint horizontal line across. This is your eye line. A very common mistake is drawing this line halfway down the circle rather than halfway down the whole head including the jaw. The circle alone is not the full head.
Step 5. Divide the space below the eye line in half and mark it. This is the nose line (the bottom of the nose, not the top of the bridge).
Step 6. Divide the space between the nose line and the chin into thirds. The mouth sits at the first third mark down from the nose. The lower lip falls at roughly the second third.
Step 7. Draw a horizontal line at the same height as the upper eye (this is the brow line). Ears run from the brow line down to the nose line.
You now have a mapped face. Every feature has a designated address before you draw a single detail.
Step-by-Step: From Blank Page to Finished Sketch
Work through these in order. Resist the urge to add detail until the overall structure is confirmed.
-
Lay in the head oval and center line. Keep pressure very light. Both should feel like suggestions, not commitments.
-
Mark the halfway line for the eyes. Measure top-of-head to chin, find the midpoint. Draw a horizontal construction line across the full width.
-
Divide the head width into five equal columns. Tick marks along the eye line are enough. Columns 2 and 4 are your eye positions.
-
Sketch the eye shapes. At this stage, simple almond shapes are enough. Focus on placement and size over detail. For more on rendering the eyes themselves, see how to draw eyes that look real.
-
Add the brow line above the eyes. Eyebrows sit just above the upper eyelid at their inner end and arc slightly outward. Mark the ear top at this same height.
-
Mark the nose bottom. Halfway between eye line and chin. The nose width is roughly equal to the space between the inner corners of the eyes (about one eye-width). Sketch the nostrils and the base of the nose lightly.
-
Place the mouth. One third down from nose bottom to chin. The corners of the mouth typically align with the inner edge of each iris (the colored part of the eye). Sketch a simple line for the lip division first, then add the upper and lower lip shapes.
-
Draw the ears. From brow line to nose line on each side, just outside the jaw outline.
-
Add the jaw and neck. Refine the jaw shape if needed. The neck attaches below the ears on each side, not at the very edge of the jaw.
-
Erase construction lines. Once you are satisfied with the structure, lighten or erase your guides. What remains should be the features themselves.
-
Add detail and shading. Only now do the pupils, eyelashes, nostril shading, and lip texture make sense to draw. Adding them earlier leads to well-rendered features in the wrong place.
Common Mistakes (and How to Fix Them)
Eyes placed too high. This is the single most frequent error. Always measure from the top of the full head, not from the top of the circle. If a sketch looks off but you cannot identify why, check the eye line first.
Features too close together. Beginners tend to cluster everything in the center of the face, leaving blank space around the edges. Trust the five-eyes measurement and let the features breathe.
The face too narrow or too wide. If the oval becomes too narrow, there is no room for five eye-widths, and features will feel cramped. Check the circle step: the cranium should be roughly as wide as it is tall before the jaw narrows it.
Ears forgotten or misplaced. Ears are easy to skip. They often end up too far back on the head or too small. Use the brow-to-nose vertical range as your sizing guide every time.
Jumping to detail too fast. Shading a pupil before the eye position is confirmed just means you will have to erase shading later. Block in all seven major landmarks before any detail work. It feels slow at first and saves time overall.
Symmetry obsession. Real faces are asymmetrical. If you spend ten minutes trying to make both eyes perfectly identical, you are drawing a diagram, not a face. Slight variation between sides often makes a sketch feel more alive.
Connecting Face Drawing to the Broader Figure
A face study is most useful when you can place it on a figure. The head is roughly one seventh to one eighth of total body height in an adult. Understanding how the neck, shoulders, and torso relate to the head prevents the "floating face" problem where a beautifully rendered portrait sits on a body that does not match. If you want to develop that further, how to draw the human figure for beginners covers those proportions in the same systematic way. Hands are another common stumbling block that pairs naturally with figure work; how to draw hands without them looking wrong addresses those proportion challenges directly.
Frequently Asked Questions
How long does it take to get decent at drawing faces? Most people see clear improvement within two to four weeks of daily 20-minute practice sessions. "Decent" is subjective, but recognizable proportions and consistent placement tend to click fairly quickly once you internalize the landmark grid. The eye level breakthrough usually comes first.
Should I trace faces to learn faster? Tracing teaches you what a finished drawing looks like, not how to construct one from scratch. It can be useful for studying line quality, but it does not build the spatial reasoning that proportions require. A better alternative is to draw from a photo reference while actively measuring before each mark.
Do all faces follow the same proportions? No. Children have larger eye sockets relative to their skulls, shorter lower faces, and wider-set features. Elderly faces show bone structure more prominently and have different soft-tissue distributions. The guidelines in this article describe an average adult face. Once you have them memorized, you can consciously deviate to draw different ages and face types.
What pencil should I use for construction lines? A 2H or H pencil (harder graphite, lighter mark) is ideal for construction lines because it erases cleanly and does not indent the paper. If you only have an HB, use very light pressure. Avoid B grades for initial construction as they smear and are harder to erase.
My two eyes never look the same. What am I doing wrong? Usually the issue is not skill but process: the second eye is drawn while the first one is still fresh in your memory rather than being measured from the construction grid. After placing the first eye, go back to your tick marks and place the second eye relative to those marks, not relative to the first eye. The grid is your reference, not the sibling feature.